
OpenBSD 4.4 Gnome install on solo
This is the second gnome desktop install on OpenBSD I made. This time using OpenBSD version 4.4 (released november 1st 2008) on an Intel Atom based hardware.
A more precise description updated for OpenBSD 4.7 is found below.
Installing Gnome Desktop and Gnome Display Manager on OpenBSD 4.7
Hardware
Below all components except the fan and "ATX 4-PIN to ATX12V P4 connector" is shown.
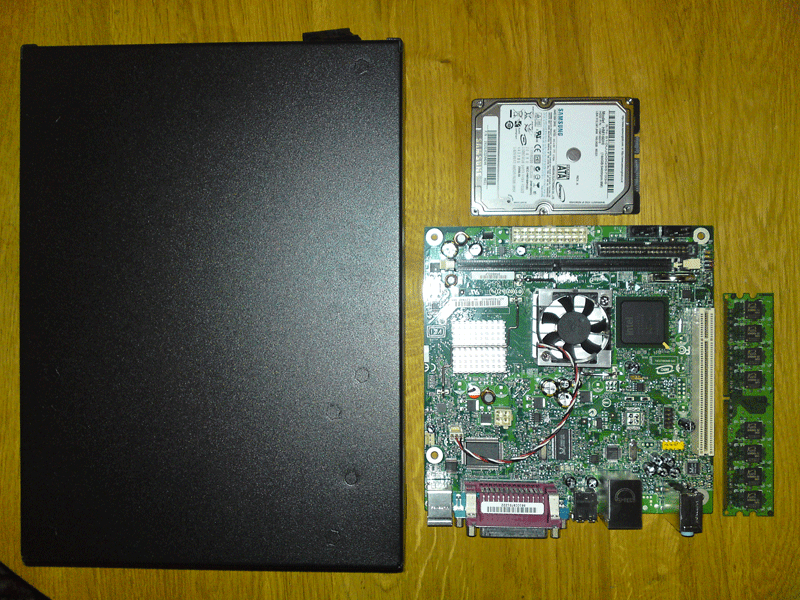
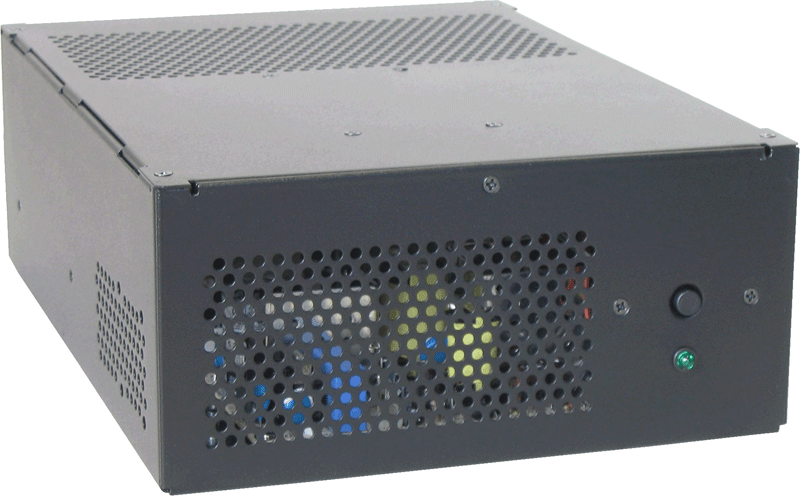
This is the case, built by Emko.
- Intel D945GCLF motherboard with integrated Atom CPU
- Original 1GB DDR2 PC5300 (667 MHz) SDRAM
- Samsung 160 GB 2.5" SATA
- Noctua NF-S12 (5dB) 120 mm fan
- Emko EM-153 chassi
- ATX 4-PIN to ATX12V P4 connector (see link). 4 pin ATX12V needed by the D945GCLF motherboard is not supported by the power supply. But the hard drive power supply is easily converted for this purpose.
The hardware works excellent and is really cool (less than 40 deg. C) and quiet (less than 5 dB).
Hardware assembly
Assembling the hardware is rather straight forward.
- Remove pre-mounted fan from the graphics engine on the motherboard. The 120 mm fan (mounted later) will replace the mini fan.
- Install the motherboard in the chassi. Make sure not to insert the power socket in the chassi until final step when basic software is installed. It is really difficult to re-mount the motherboard (if needed) when power socket is in place.
- Fasten the hard drive on to the cover.
- Mount the fan on to the cover. Because the chassi is not designed for a 120 mm fan (actually no fan at all) a set of holes must be drilled into the chassi cover. Make sure the fan will fit when cover is mounted on the case.
- Install the RAM memory on the motherboard.
- Connect power to the motherboard. Do not forget to install the additional "4 pin ATX12V P4" supply to ATX 4-PIN (hard drive power connector).
- Connect fan and hard drive to the mother board.
When everything is assembled, connect the power cord to the chassi and press the power on button. For initial OpenBSD install I usually connect a CD drive to boot from (e.g. network install is also possible). When first install is made I disconnect the CD drive and everything (chassi cover, power socket) can be assembled. Subsequent upgrades of OpenBSD may be done over network of directly from the hard drive.
OpenBSD base install
First complete the base install of OpenBSD. I connected a CDROM drive and installed from CD. Buy CD's here. OpenBSD is free to download, but I would recommend to buy the CD's the first time. I bought OpenBSD 3.8 and have bought every new release since then. The CD box is amusing and also include basic install instructions.
The basic install is quick and simple. You only need basic network settings and desired hard drive layout. The hard drive layout is dependent on the intended use of the system. I used the following partitioning.
# df -h
Filesystem     Size    Used   Avail Capacity  Mounted on
/dev/wd0a      4.9G   49.5M    4.6G     1%    /
/dev/wd0h     74.8G   23.4M   71.1G     0%    /home
/dev/wd0d      3.9G   22.0K    3.7G     0%    /tmp
/dev/wd0g     39.4G    2.5G   34.9G     7%    /usr
/dev/wd0e     19.7G   51.2M   18.6G     0%    /var
A simple guide is provided by OpenBSD101
Install from USB
See Creating install media for up to date reference.
Download install image from a close by FTP site.
wget http://ftp.eu.openbsd.org/pub/OpenBSD/6.1/amd64/install61.fs
Insert an empty USB disk and check device in dmesg.
dmesg

...
sd1 at scsibus4 targ 1 lun 0: <Kingston, DataTraveler 2.0, 1.00> SCSI2 0/direct removable serial.09511607F940359902A3
sd1: 1906MB, 512 bytes/sector, 3903578 sectors
Tranfer image onto USB disk
dd if=install61.fs of=/dev/rsd1c bs=1m
Now make sure BIOS allow to boot from USB disk in the target computer. Possibly select the USB disk to boot from at boot.
Install packages
The first thing I do when base installation is done is to add nano editor. vi is included by default but I am not very fond of it.
To install packages in OpenBSD is really simple. You only need to set PKG_PATH environment variable.
# export PKG_PATH=ftp://ftp.stacken.kth.se/pub/OpenBSD/4.4/packages/i386
Note that this is my local OpenBSD ftp mirror. You should choose one close to you.
After this you are ready to install additional packages. Packages are compiled binaries that are quickly installed. Use of packages are the recommended way of installing software in OpenBSD which is very attractive to me. See more on packages and ports and everything else you need to know in OpenBSD FAQ.
First intall nano editor.
pkg_add nano
nano is now installed and ready to be used. You may e.g. want to add PKG_PATH permanently in your .profile.
nano .profile
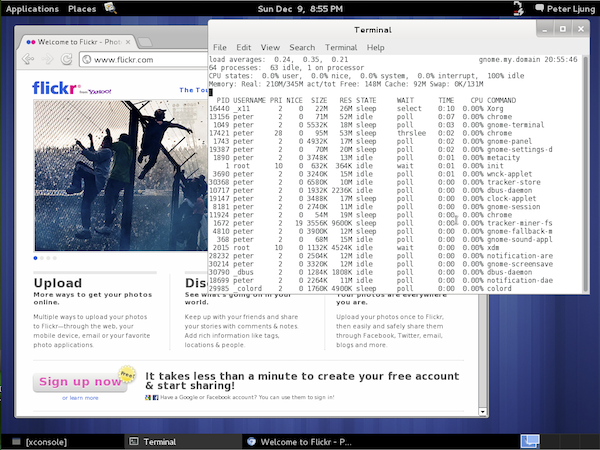
Install gnome
If you are using supported hardware gnome install is really simple as well. Try starting X.
startx
Return from X with CTRL+ALT+BackSpace. This should work fine.
To install gnome a set of packages need to be installed.
pkg_add gnome-session
pkg_add gnome-desktop
pkg_add gdm
This should be enough to start gnome. Try to start gnome.
gdm
Return from X with CTRL+ALT+BackSpace.
Now add additional packages as you want. I installed the following.
pkg_add gnome-panel
pkg_add gnome-audio
pkg_add gnome-menus
pkg_add mozilla-firefox
pkg_add mozilla-thunderbird
pkg_add empathy
pkg_add evince
pkg_add transmission
pkg_add openoffice
pkg_add lyx
pkg_add jdk
pkg_add mysql-server
pkg_add samba
pkg_add wget
pkg_add unzip
Sometimes there are install instructions to complete the installation/configuration of the installed package. These are very useful. You are able show the install messages at a later stage by issuing.
pkg_info -aM
This is how simple it is to install OpenBSD as perfect gnome desktop system. Look for more packages on http://www.openports.se.
Install gnome on OpenBSD 5.2
In OpenBSD 5.2 a meta package is included. So the base install of gnome has become somewhat simpler.
pkg_add gnome
This command installs all the basic packages needed to run gnome.
Next, you should read the OpenBSD specific readme for gnome.
ls /usr/local/share/doc/pkg-readmes/gnome-*
Here you will find all the information you need. Gnome requires dbus to run.
pkg_add dbus
/etc/rc.d/dbus_daemon start
To start gnome at boot add the following to ~/.xinitrc (for startx) and ~/.xsession (for xdm)
exec /usr/local/bin/ck-launch-session /usr/local/bin/gnome-session
Also start dbus and avahi at boot by adding the following to /etc/rc.conf.local.
multicast_host=YES
ntpd_flags=             # enabled during install
xdm_flags=              # enabled during install

pkg_scripts="dbus_daemon avahi_daemon"
First try it by. Then reboot.
startx